

If you’re running a Shopify store, understanding how customers move through your checkout is essential. Hotjar gives you powerful session recordings, heatmaps, and event tracking — but by default, it doesn’t track Shopify’s checkout steps.
In this guide, I will show you how to correctly set up Hotjar tracking for your Shopify checkout using Customer Events (Pixels) in Shopify.
Why Track Checkout in Hotjar?
Hotjar helps you collect heatmaps, recordings, and events. By tracking checkout actions, you can:
- See how many users click checkout but don’t complete payment.
- Identify friction points between cart → checkout → order confirmation.
- Measure conversion rates inside Hotjar Funnels.
- Understand real customer behavior beyond Google Analytics.
Step 1: Install Hotjar on Your Shopify Store
First, make sure Hotjar is running across your storefront:
- Copy your Hotjar tracking code from your Hotjar dashboard.
- Go to Shopify Admin → Online Store → Themes → Edit Code.
- Open
theme.liquidand paste the script before the closing</head>tag. - Save changes.
This ensures Hotjar records all standard storefront interactions.
Step 2: Create a Custom Pixel in Shopify
Shopify makes it simple to inject tracking scripts through its Customer Events feature. You don’t need to edit theme code or templates.
- Log in to your Shopify Admin.
- Go to Settings → Customer Events.
- Click Add Custom Pixel.
- Give it a name (e.g.,
Hotjar Checkout Tracking). - Paste the script below into the editor.
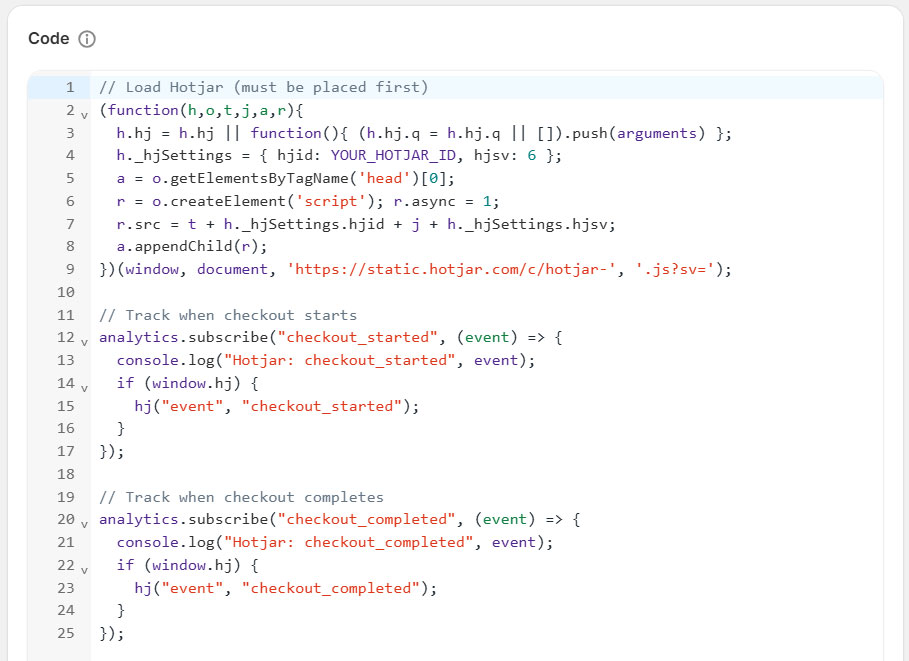
Step 3: Insert the Hotjar Loader and Checkout Event Tracking
The following code loads the Hotjar script and listens for Shopify’s checkout lifecycle events. These include:
checkout_started→ when a customer begins checkout.checkout_completed→ when an order is successfully placed.
Step 4: Save, Connect, and Test Your Pixel
Once you’ve added the code:
- Click Save.
- In the Customer Events dashboard, click Connect to activate the pixel.
- Perform a test checkout in your store.
- Open your browser console to confirm the logs:
Hotjar: checkout_startedHotjar: checkout_completed
- Verify that events appear in your Hotjar dashboard under Events.
If you see both logs in your console, Hotjar is successfully tracking your checkout flow.
Step 5: Use Events in Hotjar Funnels
Now that you’re tracking checkout_started and checkout_completed, you can:
- Build a Hotjar Funnel to calculate your drop-off rate.
- Watch recordings of sessions where users abandoned checkout.
- Use heatmaps to see which checkout elements get attention.
That’s it. This helps you optimize your checkout flow and boost conversions.
 Store Setup